DIMM Seeing Monitor - A MaximDL Application
This application for MaximDL allows one to easily measure the atmospheric seeing at an observing site, using easily available equipment. When using in conjunction with my Sky Brightness plugin it is a useful way of quantitatively measuring the quality of a given observing site.
The algorithm I used for measuring the atmospheric seeing is described in a paper by Bally, Theil, Billawalla, Potter, Loewenstein, Mrozek and Lloyd, available online here.
Measurement of the seeing is useful for determining the effect of short term atmospheric turbulence on long exposures, as defined by the achievable FWHM of those images. The method used herein is DIMM - Differential Image Motion Monitor, this is used by many major observatories, e.g. CTIO and ESO.
DIMM
is useful because it measures the relative (or differential) motion of
two images of the same star, which reach the detector through two
slightly different paths through the atmosphere, thus they are
affected differently by the pockets of turbulence through which they
pass. Since the two images are of the same star and they are captured
simultaneously, they are not affected by telescope tracking errors or
vibration, but only by the atmospheric distortions.
Atmospheric
seeing typically changes in the order of 10-20ms of elapsed time, so
individual exposures must be in that duration range to be able to
"freeze" the seeing to measure it. To achieve this, a high speed
camera is required - guide cameras or planetary imaging cameras are
typically ideal. The camera should also ideally support hardware
subframes, since the software will use these to increase the image
capture rate.
In order to generate two images for a single star, one must put a dual aperture mask on the telescope where the two holes in the mask are separated by a distance of at least double their individual diameter. There are two main methods for causing the resulting dual star images to diverge:
1) Place a wedge prism in
one of the apertures, such that it diverts the incident beam by a small
about (typically a fraction of an arcsec)
2) Defocus the telescope such that the resulting beams have not converged by the time they reach the sensor.
Option (2) simply requires a dual aperture Hartmann mask, which is commonly available or easily constructed. Since the effective focal ratio of the smaller apertures is far higher than the unobstructed telescope, the critical focus Zone is also far larger. Thus, once can shift the telescope focus which would defocus the star with the native focal ratio of the scope, but with the stopped down aperture the sensor will still be within or very close to the critical focus zone, resulting in a sharp star image. For a 250mm (10 inch) SCT telescope, a mask with two holes of ~50mm diameter with a center to center separation of ~170mm is sufficient. Smaller apertures will give a greater focal ratio and thus a greater critical focus range, allowing more defocus and thus a greater star image separation, but will require the use of brighter stars and thus may mean there is not always a usable star near the Zenith.
The downside of Option (2) is that if the telescope is defocused too much such that the Strehl ratio drops below about 0.5, the result can be somewhat biased. Nevertheless, it provides a simple way for the advanced amateur to rate the quality of their site on a night by night bases, perhaps to help decide on the type of imaging to be performed that night. A reasonable way to determine the amount of defocus which is acceptable is to take a series of 10ms exposures with the mask in place but with the telescope at normal focus, measure the average FWHM, then gradually defocus, periodically measuring the resulting FWHM and stop once it becomes more than 20% or so larger than when at best focus. Once you have determined a workable focus offset, you can quickly move the focuser by that amount and mount the Hartmann mask whenever you wish to measure the site seeing.
Whichever optical divergence method is used, the operation of the software is the same - fit the aperture mask, point the telescope at a bright star near the Zenith, then after the user identifies the initial location of the two star images, the software captures a repeating sequence of very fast exposures and calculates the longitudinal and transverse differential motion between the dual star images in each, using the fomulae in the above cited paper to then calculate the effective seeing value over the sample period.
Usage:
Upon launching the Seeing Monitor application, it will automatically connect to MaximDL and the user is presented with the main screen:
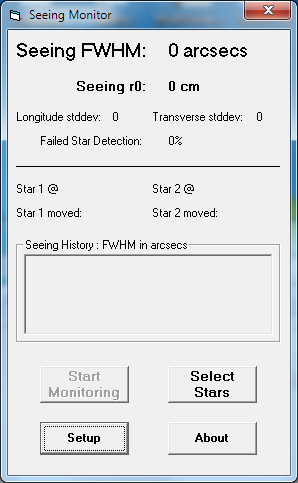
The
top section of the display presents the results of each seeing
measurement - this is the effective FWHM (in arcsecs) which can be
expected from a long exposure, along with the "r0" value which is the
telescope diameter (in cm) below which the seeing will have no effect
and the telescope will effectively be diffraction limited (ignoring any
other optical aberrations).
The standard deviation of
observed longitudinal and transverse differential motion is
also displayed, along with a percentage of individual exposures which
were too badly distorted by turbulence to be able to measure the star
centroids. Higher failed detection rates indicate possible
under-estimation of the resulting FWHM, since there were moments of
exceptionally bad seeing which were not able to be measured. These are
normally obvious from watching the individual exposures - the stars
smear out or vanish completely.
The middle section displays the dual star locations and movement amounts for each individual exposure as it is taken, in pixels.
The lower section contains an auto-scaling history graph plotting the measured seeing FWHM values over time.
At the bottom are the control buttons:
Setup Button: This displays a setup dialog:
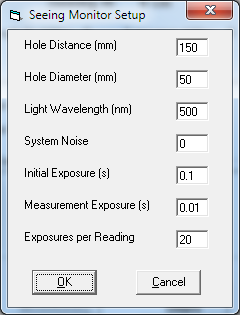
Here the user can specify the distance between the hole centers (in mm), the hole diameters (in mm), the wavelength of light being captured (in nm) (typically 500nm is used for full range visible light), system noise (as described in the paper cited above, default 0), plus the exposure settings.
The user can specify a longer exposure for the initial star image selection process, which is useful to allow it to "average out" the seeing and to get a good average location the software will then use for monitoring the star centroids. The actual seeing measurement exposures should be in the 10-20ms range (0.01-0.02 seconds). The number of exposures to take to generate each seeing reading depends somewhat on the time resolution required and the speed of the camera used, a value of around 20 should be reasonable.
About Button: This displays the software version number and author contact email address.Select Stars: This is used to teach the program about the initial locations of the dual star images - this must be done before seeing measurements can be performed and can be redone at any time if the lock on is lost.
Once the initial exposure has been taken, simply click once on each of the two star images - there will be a confirmation beep after each click.
The software will automatically track the stars over time, adjusting the subframe location in the fov automatically to keep them centered, but if clouds etc cause the lock to be lost, this button can be used to reacquire the star locations.
Start Monitoring: Once the star image locations have been selected, this control is enabled and once selected the software will start taking exposures and measuring the site seeing. When the seeing measurements are being taken, this control changes to "Stop Monitoring" to allow the user to abort the current monitoring run.
Choosing a Star:
In order to find a star which is both bright enough and close to the Zenith, I find it useful to use the catalog search feature built into the Observatory control in MaximDL. It is easy to set up a search filter which looks for stars of a specified magnitude range and also above a specified altitude from the horizon.
Here is the search filter I use:
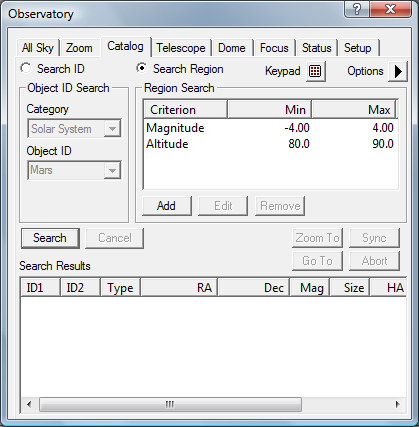
Simply run the search, order them by Altitude by clicking on the column header, then click on the highest star with an acceptable magnitude and select the "Go To" button to slew to it.
Once the app is running and taking samples, it will output the raw star positions and calculated r0 and FWHM values into a RawStarMeasurements.csv output file in your Documents folder.
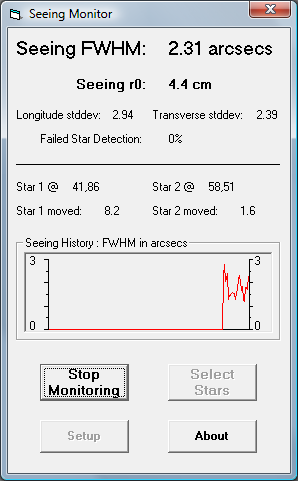
Results:
Here is a screen capture of the seeing monitored from my balcony mounted telescope over a short period at about 10pm after a hot summer's day - it is interesting to do additional runs later in the night and to observe the seeing measurement improve as the ground cools off:
Version history:
v1.0 - Initial release. Installer now updated to work on Windows XP.
v2.0 - Fix seeing computation algorithm, original release generated incorrect result
v2.1 - Fix startup crash
Seeing Monitor v2.1
If you download this to give it a go, please post feedback on the MaximDL
Yahoo group, or email me directly at: winfij_AT_gmail_DOT_com
 I
have also set up a new Yahoo group specifically for announcing new apps
like this one, as well to offer better support/feedback. Please sign up
if you want to keep up with new releases and updates: New Yahoo Group
I
have also set up a new Yahoo group specifically for announcing new apps
like this one, as well to offer better support/feedback. Please sign up
if you want to keep up with new releases and updates: New Yahoo Group
One final note - if you have any errors, please note the exact error messages
and let me know!
Regards,
John