Since I wanted to be able to leave my robotic scope out imaging
all night while I slept, I wanted a way to monitor the sky for clouds
so I would know if I had to cover the scope. In order to do this, I
wanted a low cost sensor to monitor the sky, plus an alarm
application I could run on a separate PC in my bedroom.
I found the Extech RH401 IR
thermometer which was relatively low cost but came fitted with an
RS232 port for easy interfacing to a PC. It also has the advantage of
reading the ambient temperature which is used for calculating the sky
conditions. The RH401 is available online from here
for about $200US.
More recently, I've switched to
supporting a better and cheaper alternative – a raw IR sensor
intended for DIY projects made by Phidgets, model 1045_1, available
from them here
for about $87US. It does not require a separate power supply and is
simply connected over USB.
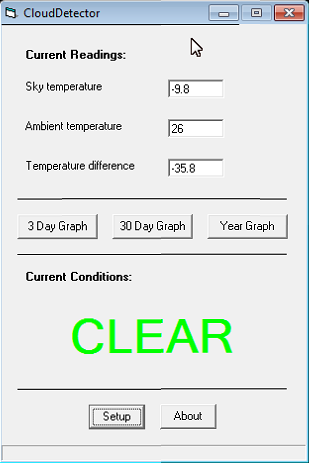
The Cloud Detector works by reading
the sky temperature using the IR sensor, plus the ambient
temperature. If the sky is clear, the sky temp is very low, but if
clouds are present they reflect hear from the ground and the sky temp
increases. By calculating the difference between the ambient temp and
the sky temp, the amount of cloud cover can be determined.
The
download links below give two applications, each of which is detailed
separately.
Cloud Detector
The
Cloud Detector app takes a reading of the sky and ambient temps from
the sensor package every 10 seconds and calculates the difference
between them. This is compared to the configured difference
temperatures which represent Cloudy and Very Cloudy skies and the
current sky condition is displayed. Every quarter hour the average
sky condition is logged to a file on disk and the history graphs are
updated. There are three history graphs, covering 3-day, 30-day
and 1-year periods. The history graphs are useful for fine-tuning the
thresholds you set to indicate the sky conditions. The
CloudDetector app also has the ability to create an HTML web page to
reflect the current and historical readings. This can either be on
the same PC or a remote machine via a UNC path or mapped drive. If
you use remote hosting for your web site, you can set up one of the
free tools to periodically upload the updated page to your hosting
provider. An example of the generated page is my
live status page. Additionally, after each reading the current
sky status is saved to a file named "status.txt" in the
same path as the executable - this file is monitored by the Cloud
Alarm app to feed it the current sky conditions.
Installation
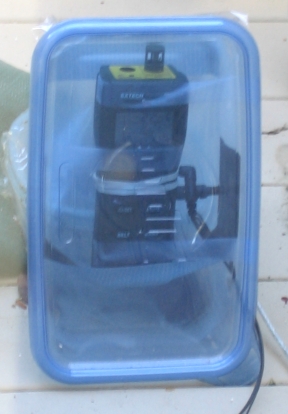
Extech RH401
I mounted my RH401 in a plastic food container, with an opening
cut in the plastic one end and sealed over with clear plastic food
wrap. The food wrap seems to be transparent to IR while still being
waterproof. To operate the RH401, it is best to power it from an
external 9v supply - I bought one for $7 and cut the DC cord to
splice in a 10' extension to run outside. I did the same with the
serial cable. The IR sensor is only active when the button is
depressed, so I simply wrapped a rubber band around the unit with a
small piece of wood pushing the activation button down. When you
power on the unit, the IR button must not already be pushed, instead
you hold down the C/F button and then press the on button - this
overrides the auto-off timer. Once it's on, simply put the block
under the rubber band to activate the IR sensor. Also remember to pop
out the retractable ambient temp sensor module. You need to manually
switch the unit back on whenever power is interrupted, but it only
takes a couple of seconds in practice.
N.B.
The RH401 package does not come with a cable to connect to the PC -
the unit needs a custom 3.5mm to DB9 cable. The cable is included
with the RH405 kit or available for purchase separately.
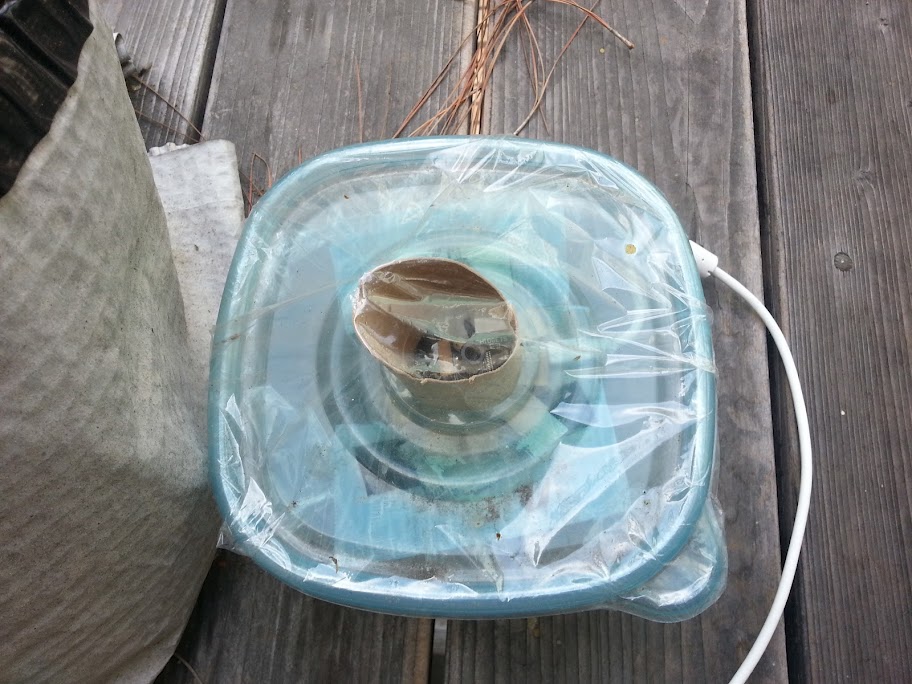
Installation Phidgets
1045_1
The Phidgets sensor was mounted in a similar fashion, in a small
food container with a food-wrap covered window cut in the top, with a
section of cardboard tube to create an angled surface to allow rain
water to run off.
The
Phidgets sensor requires installation of their driver package, which
is available for download here.
The Phidgets CloudDetector download below is only an updated
executable rather than a full installer, so first download and
install the RH401 package and then replace the CloudDetector.exe file
with that from the v2.0 zip file.
Config options (RH410):
- Cloudy and Very Cloudy temperature difference
thresholds. - Com (serial) port to which the
RH401 is connected. - Path to save the
generated web page into.
Config options (Phidgets):
- Cloudy and Very Cloudy temperature difference
thresholds. - Path to save the generated web
page into. - Correction value for the ambient
temperature sensor, I found an offset of -5C gave a better reading.
Version history:
v1.0 - Initial release. v1.2 - Better handling of invalid com
(serial) port selection. Packaged into installer to include required
support files. v1.3 – Improved graphing.
The Cloud Alarm app monitors the "status.txt" file
generated by the Cloud Detector app. It must be able to read this
file, which can either be on the same PC or on a remote PC in a
shared directory accessible through a UNC path or mapped drive. The
contents of the status file are read every time it is updated and the
app displays the current reading stored in that file.
Two
configuration options allow the user to specify how tolerant the app
is of transient sky changes, so that the alarm is not triggered by
individual passing clouds or sucker holes. You can specify how long
the changed condition must persist for the alarm to be sounded. There
are two sky states "SAFE" and "UNSAFE". The app
can be configured to sound an alarm when the state changes from SAFE
to UNSAFE and can also be set to sound when it changes from UNSAFE to
SAFE (in case you want to wake up and set up the scope/open the
observatory). Additionally, there is an option to treat the
intermediate "Cloudy" condition as equivalent to either
"Clear" or "Very Cloudy" depending on how willing
you are to accept partially cloudy skies. For maximum safety set it
to treat "Cloudy" as "Very Cloudy".
The
final configuration option is to set the continuous time the sky must
be in its new state before the alarm sounds. Setting a short time
makes it more sensitive but you may get false alarms due to an
isolated passing cloud or clear spot. I tend to err on the side of
caution and set a longer time to transition from UNSAFE to SAFE and a
shorter time to transition from SAFE to UNSAFE.
If the Cloud
Alarm app cannot get an updated reading for two minutes, it will also
trigger the alarm, as a failsafe. This covers the cases where either
the communication between the PCs has failed, the Cloud Detector
app has failed, or the sensor itself has failed. If a file exists
in the same directory as the Cloud Alarm app which is called
"alarm.wav" that file will be played as the alarm sound,
otherwise the app will use the PC speaker to sound a siren. The
advantage of using a wav file is that you can run it through powered
PC speakers, allowing you to turn the volume up if you are a deep
sleeper.
Once the alarm starts to sound, it will continue
sounding every five seconds until manually canceled or the condition
triggering the alarm goes away.
Config options:
- Path to read status.txt file from.
- Time in minutes to transition from UNSAFE to SAFE when the sky is
Clear. - Time in minutes to transition
from SAFE to UNSAFE when the sky is VeryCloudy.
- Select whether "Cloudy" will be treated as "Clear"
or "VeryCloudy". - Enable the alarm
on becoming SAFE and/or UNSAFE.
If you download these to give them a go, please email me directly
at: winfij_AT_gmail_DOT_com One final note - if you have any
errors, please note the exact error messages and let me know!